Model Builder Community: Upload & download MB4 files. Share model buildings, building plans, dioramas, model layouts & more!
While the selection of images and textures available in Model Builder consists of over 500 unique samples there may come a time when you need something a little different. Model Builder is designed with creativity in mind to allow you to customize any building you create. If you have a digital camera, capturing pictures of windows or doors in a building that you would like to model is a great way to make your model look most like the actual building you are modeling. To import an image choose "File" > "Import..." in the Design Screen. Browse to your image. Once selected move the plus icon to any spot on the screen. Then resize as needed.
You can take pictures of anything you think might make a good addition to your project. Start with your own house or buildings around your hometown, many of them have interesting features such as doors and windows or even whole sides of the buildings. One thing to think about though is the better the quality of your digital picture the higher quality your printed replica will be. Take your time and use a reasonably good quality camera to take your pictures. To avoid shadows and bright spots try and wait for an overcast day to get the best picture. If you are taking a picture of an individual part of a building do not get too close to avoid distortion.
Before you bring in a picture into Model Builder you will need to crop out the Window(s)/Door(s)or other items of interest from your picture. This can be done using one of several good image editing programs. Adobe offers two different levels of photo management software with its Photoshop CS4 or Photoshop Elements 7, both of them can be used for cropping and saving your images to the right format. Corel also offers a handy suite of photo editing software called Paint Shop Pro that will also do the job for you.
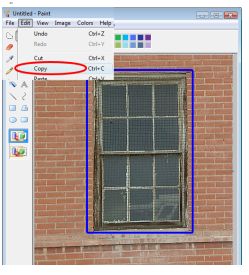
You can even use Microsoft Paint, which comes installed free on all Windows computers. To use Paint: Open your photo in "MS Paint", then use the "Select" tool and surround the Window or Door or item from the picture.

Select the piece you need and copy to the clipboard using
Edit > Copy or keyboard shortcut "Ctrl c". Switch focus to Model Builder and then select 'Edit' > 'Paste', your mouse will show a ↑+ Icon on the design screen. Click once to drop your image. You can also import saved images using File > Import. You can import from 3 file formats: bitmap (.bmp), jpeg (.jpg), and .gif .
Now your image is within Model Builder, You can use the resize, duplicate, stretch image tools as well as the distribute/align functions
.gif format is the only way to use images that are not rectangular and also will allow you to use transparency. You must associate the transparency with the .gif before you add it to Model Builder in order for it to work. One last word on .gifs, make sure to save them to a file smaller than 500k and try to limit the number of .gif images to reduce the risk of overly large Model Builder file sizes.
There are also several places on the Internet that offer images that you can use for your new model buildings. If you need images of textures like brick walls or marble floors, even cloth and gravel images there are also several websites that specialize in these types of images. Many of these sites are free to use so check around and you will be amazed at what is available.
These images may need to be imported into a photo editing program and sthen imported them for use in Model Builder, You can also try using the windows clipboard Edit>Copy and then paste direct into Model Builder. You can definitely add much more variety to your new model railroad city or town with imported iamges. Building your new town can be a lot of fun and using Model Builder to create it will give you unlimited choices without breaking the bank.