I would like to know specifically how other modelers are putting their buildings together. I use two sided tape to attach the printed building to card stock, which is usually cereal boxes. That works well for me. I've also learned to lay out the buildings with the edges of the different sides close together or butting up to each other. The sides I connect to close the building, are on the back side of the building. That for me, has been the tough part. Most of the buildings I make are narrow brick, 2-4 storey building from the early 20th century. They have mostly flat roofs. I make a small square of card stock for the roof and one for the bottom of the building, and glue them into place to make it more rigid. I'd be interested in anyone who can give me some tips on how they "button up" that last side of the building. I tried using tabs and it didn't work quite as well as I thought it would. I'm modeling in N Scale and it's small for my big fingers! I would appreciate any ideas, It's got to be better than what I'm doing.
Thanks, Gazerm42
Putting together the buildings
I print my structures on Matt Paper Heavyweight. That should be heavy enough for N scale smaller structures without needing reinforcing. Buildings are designed to fold at the corners with tabs used as needed. Double stick tape does work well although Elmer's white glue is best when applied sparingly. It will tack together quickly. The card stock is added after wards for stiffening as needed.
Wood blocks work well for bending the 90* angles. Be careful about rubbing off the printing.
I leave the bottom open. You could always glue in a wood block for a floor later. More often then not, the back side of a building is going to face the track, so you want it looking as good as the front.
You can get N scale ladders and stairs for fire escapes. The plastic glue will stick to the matt paper if applied to the plastic and pressed against the paper. Plastic dowels work well for vents, chimneys, and other details.
I want to thank gazerm42 for the downloads of signs and other jpeg's made available to all of us that or into model building and add what i am trying to do. I am going to try to print my creations on Decal paper and install the decal on a foam board. The foam board is about 3/16" thick reinforced by a thin cardboard. I am using the clear back decal paper, it is available in clear or white.I just started this so i can't say that it is a full proof way but so far a building i made in HO looks good so far. I will post any problems i run into.
Paulw
Paulw
-
evande
- Site Admin
- Posts: 372
- Joined: Tue Sep 02, 2008 3:40 pm
- Anti-spam Test 1: No
- Anti-spam Test 2: 5
- Location: Denver, CO
- Contact:
Paul
Decal paper is pretty expensive and may not be necessary. You can print on full-sheet label paper, it has a sticky back you just peel off the backing.
OR you can print onto Matte Photo paper which is our preferred medium. We like photo paper because it gives the best detail and it accepts a lot of ink, and it does not yellow or fade much over time. If you use the photo paper, use spray glue or use a thin layer of glue on your foam board. Do not put glue onto the paper it might wrinkle. In model builder under "help" there is a file called "modeling help" where we talk about how to spread glue. We also made a few videos on building structures we plan to upload them as we have some time.
Evan Designs
Use decal paper ONLY if you are going to put it on a plastic surface. Be sure to seal when dry or it may peel later on.
Otherwise, just print directly to Matt photo paper heavyweight and use that material for your structures. It is cheaper then the decal sheet and will save a step in construction.
Full sheet label paper is the better alternative to stick to any suitable surface. For best results, be sure that it is suitable for the printer that you are using.
-
treadhead1952
- Posts: 15
- Joined: Thu Sep 24, 2009 4:14 pm
- Anti-spam Test 1: No
- Anti-spam Test 2: 5
Hi All,
I have used Aleenes' Tacky Glue for a while now, I find it is less watery than Elmers White Glue, dries much quicker and holds just as strong. Most buildings that I construct are printed out on 110 pound Cardstock, I use Wausaus' cardstock available at Office Depot, They also make a 65 pound variety that is good for fine details and rounded objects that the thicker cardstock may have problems conforming to. Laminatiing the card stock to other materials to gain thickness is easy enough, I have used 3M Super 77 in the aerosol can to laminate paper to plastic styrene sheet with pretty good results. Balsa wood is also another excellent material to use, there Aleenes' Tacky Glue or Elmers White Glue works fine with Aleenes' getting a pick over Elmers due to warpage in the Balsa Wood.
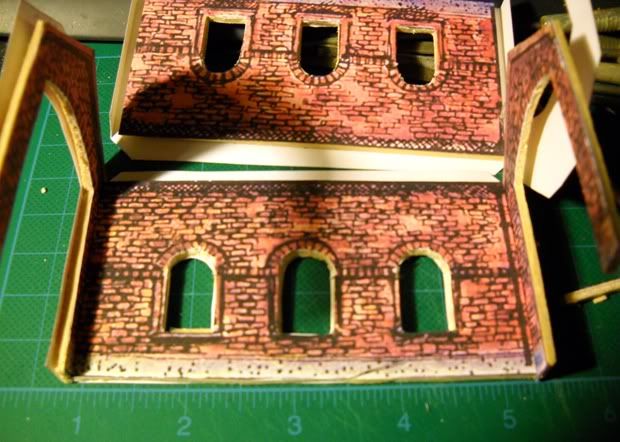
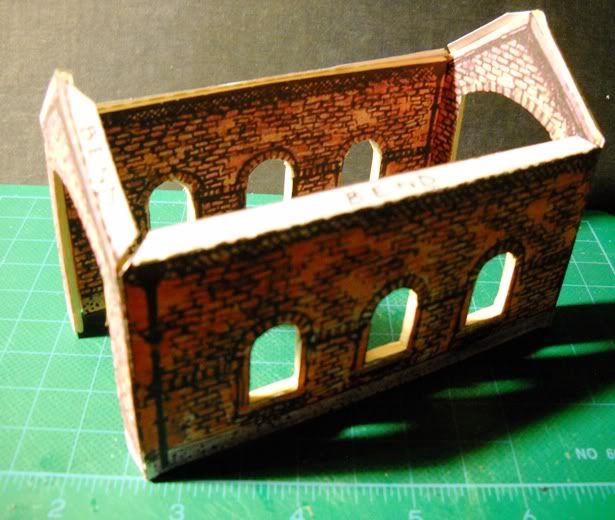
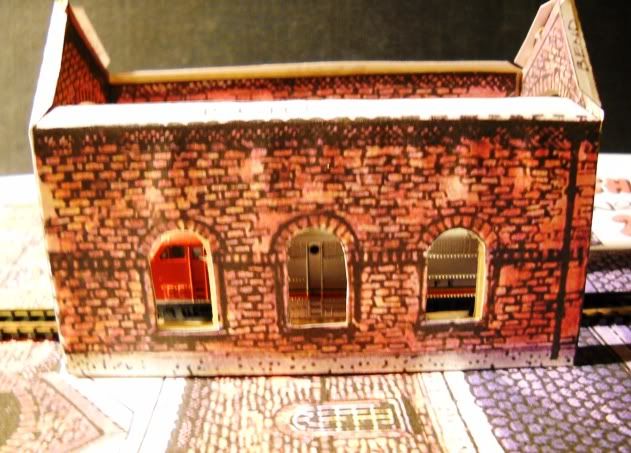
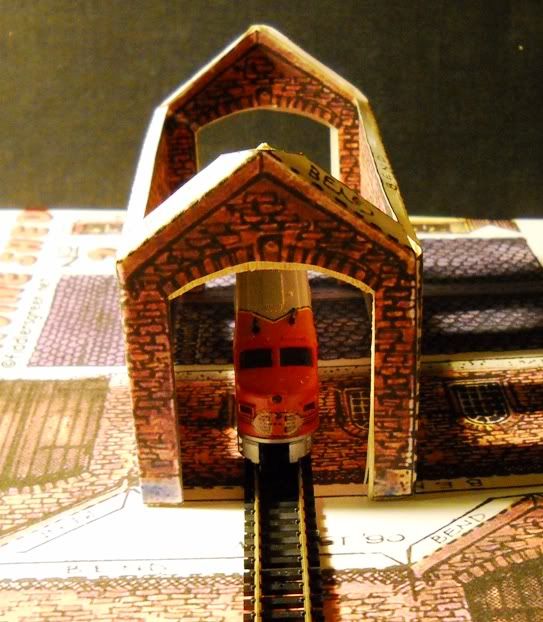
Tabbing your models can get tricky at times. I like to follow the lead of Chip from Fiddlers Green since he has a lot of experience with the subject. I am working at building a one stall Engine House from his line of buildings and liked the way he tabbed it together. Two walls form a section with tabs placed on the ends of both. I used some balsa wood sheet to add thickness and multiple printouts to put an interior since I will be showing what is inside through the large windows and doors on either end of the building. I glued the interior parts first to the balsa wood, fitting them by trimming and when assembling the sections into one unit fit the exterior wall tabs on the balsa under the exteriors. It makes for a very sturdy detailed shell to add more parts to for a 3 dimensional appearance to your subjects.


Jay
treadhead1952
Las Vegas, NV
I have used Aleenes' Tacky Glue for a while now, I find it is less watery than Elmers White Glue, dries much quicker and holds just as strong. Most buildings that I construct are printed out on 110 pound Cardstock, I use Wausaus' cardstock available at Office Depot, They also make a 65 pound variety that is good for fine details and rounded objects that the thicker cardstock may have problems conforming to. Laminatiing the card stock to other materials to gain thickness is easy enough, I have used 3M Super 77 in the aerosol can to laminate paper to plastic styrene sheet with pretty good results. Balsa wood is also another excellent material to use, there Aleenes' Tacky Glue or Elmers White Glue works fine with Aleenes' getting a pick over Elmers due to warpage in the Balsa Wood.
Tabbing your models can get tricky at times. I like to follow the lead of Chip from Fiddlers Green since he has a lot of experience with the subject. I am working at building a one stall Engine House from his line of buildings and liked the way he tabbed it together. Two walls form a section with tabs placed on the ends of both. I used some balsa wood sheet to add thickness and multiple printouts to put an interior since I will be showing what is inside through the large windows and doors on either end of the building. I glued the interior parts first to the balsa wood, fitting them by trimming and when assembling the sections into one unit fit the exterior wall tabs on the balsa under the exteriors. It makes for a very sturdy detailed shell to add more parts to for a 3 dimensional appearance to your subjects.


Jay
treadhead1952
Las Vegas, NV